Orchestrating CloudQuery Syncs with Kestra
This tutorial shows how to run CloudQuery as a Kestra flow, using the HackerNews API as a source and CSV file as a destination. Kestra is an open-source event-driven orchestrator, which has a dedicated CloudQuery plugin.
You can use Kestra to:
- schedule CloudQuery syncs in a simple, declarative way using a built-in code editor
- run your syncs based on events from other systems e.g. a new file in your S3 bucket, new message in a queue, or a new webhook request
- monitor your syncs from a friendly UI and get notified when they fail.
Prerequisites
Step 1: Install Kestra
Kestra needs CloudQuery API key stored as a secret. Unless you use the Enterprise edition, the API key needs to be Base64 encoded and passed as an environmenet variable.
To encode the CloudQuery API key stored in the CLOUDQUERY_API_KEY environment variable, run
export SECRET_CLOUDQUERY_API_KEY=$(echo $CLOUDQUERY_API_KEY | base64)Then start Kestra container and pass in the new environment variable:
docker run --pull=always --rm -it -p 8080:8080 --user=root -v /var/run/docker.sock:/var/run/docker.sock -v /tmp:/tmp kestra/kestra:latest server localTo learn more about Kestra startup configuration and options, see the Kestra Getting started guide.
Once the container is running, open http://localhost:8080 in your browser.
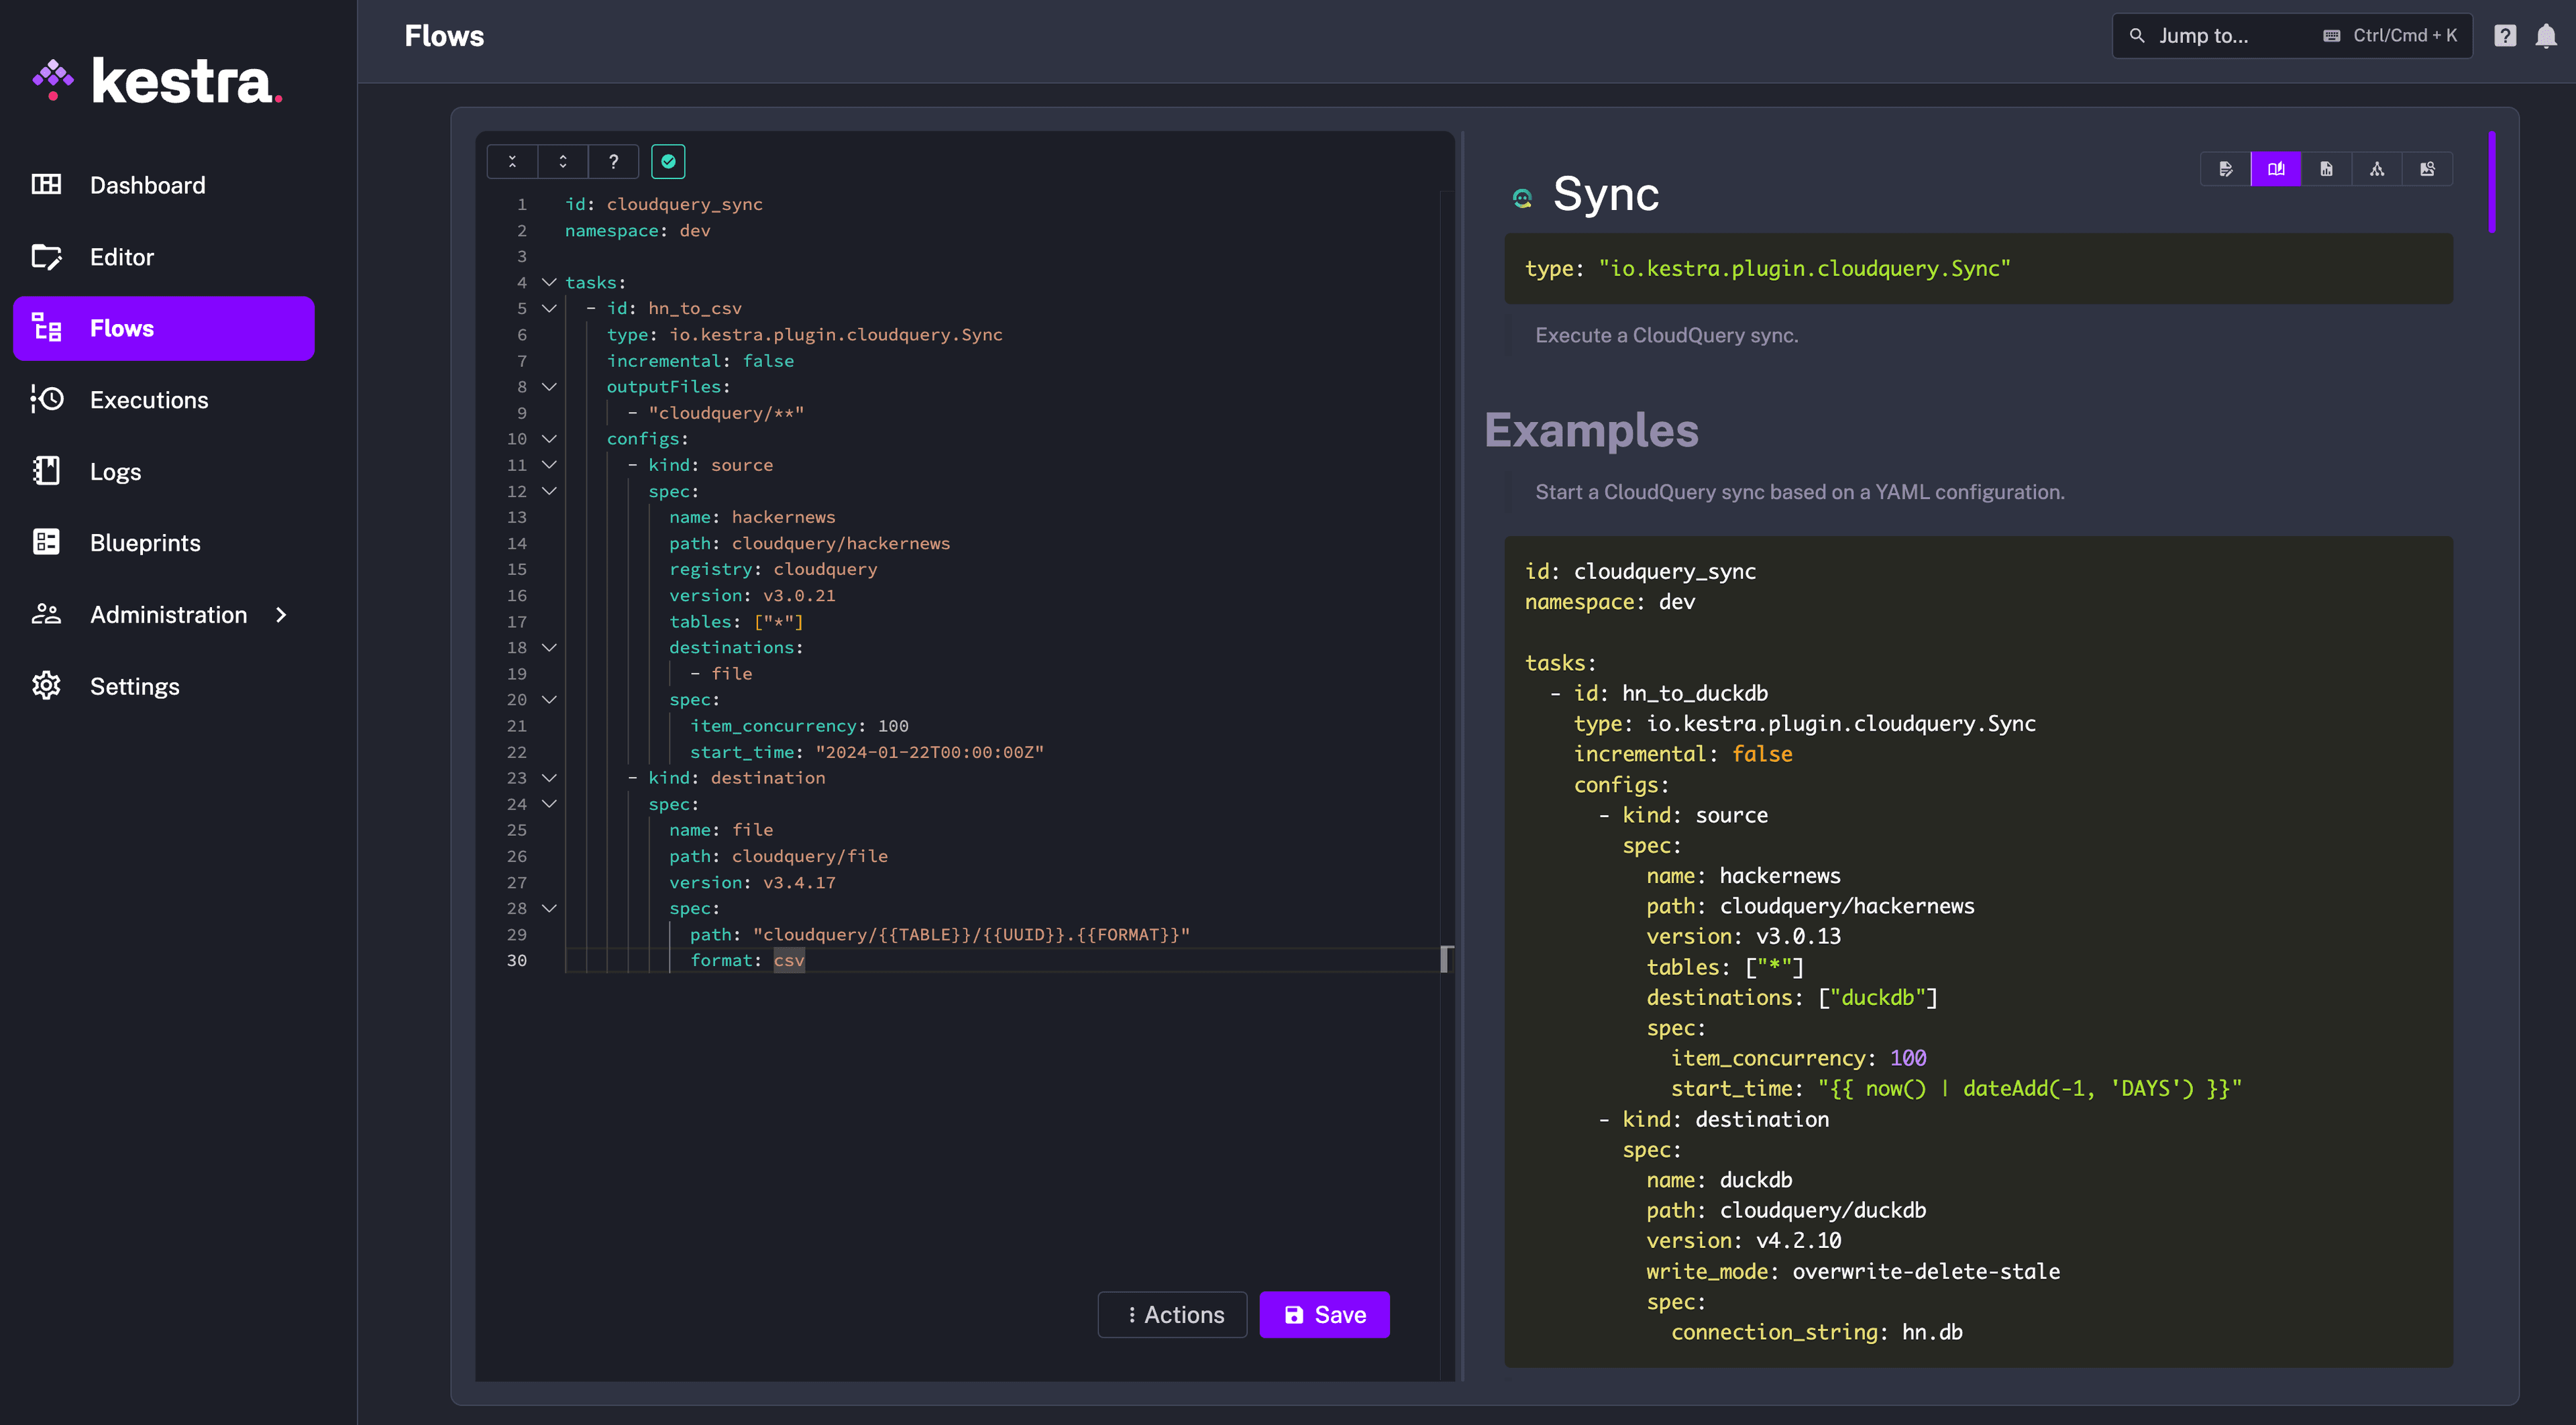
Step 2: Create a Kestra flow
Inside the Kestra UI, go to the Flows page and click on Create. You can now paste the following content (make sure to update the connection string and set the CloudQuery API key):
tasks:
  - id: wdir
    type: io.kestra.plugin.core.flow.WorkingDirectory
    tasks:
      - id: config_files
        type: io.kestra.plugin.core.storage.LocalFiles
        inputs:
          config.yml: |
            kind: source
            spec:
              name: hackernews
              path: cloudquery/hackernews
              registry: cloudquery
              version: v3.7.23
              tables: ["*"]
              destinations:
                - file
              spec:
                item_concurrency: 10
                start_time: "{{ now() | dateAdd(-2, 'HOURS') | date("yyyy-MM-dd'T'HH:mm:ssX", timeZone="UTC") }}"
            ---
            kind: destination
            spec:
              name: "file"
              path: "cloudquery/file"
              registry: "cloudquery"
              version: "v5.4.22"
              write_mode: "append"
              spec:
                path: "/output/{{'{{TABLE}}/{{UUID}}.{{FORMAT}}'}}"
                format: "csv" # options: parquet, json, csv
      - id: run_sync
        type: io.kestra.plugin.cloudquery.CloudQueryCLI
        env:
          # Visit https://kestra.io/docs/concepts/secret to learn how to manage secrets in Kestra
          CLOUDQUERY_API_KEY: "{{ secret('CLOUDQUERY_API_KEY') }}"
        commands:
          - cloudquery sync config.yml --log-console --log-level=debug
        outputFiles:
          - "**/*.csv"
The flow will extract HackerNews Items published in the last two hours and load them into a CSV file. You may notice that the input to the config_files task is virtually identical to your CloudQuery configuration file.
Kestra flows are built using a declarative YAML syntax, in the same way as you know it from CloudQuery.
Once you configured the flow in the editor, click on Save.
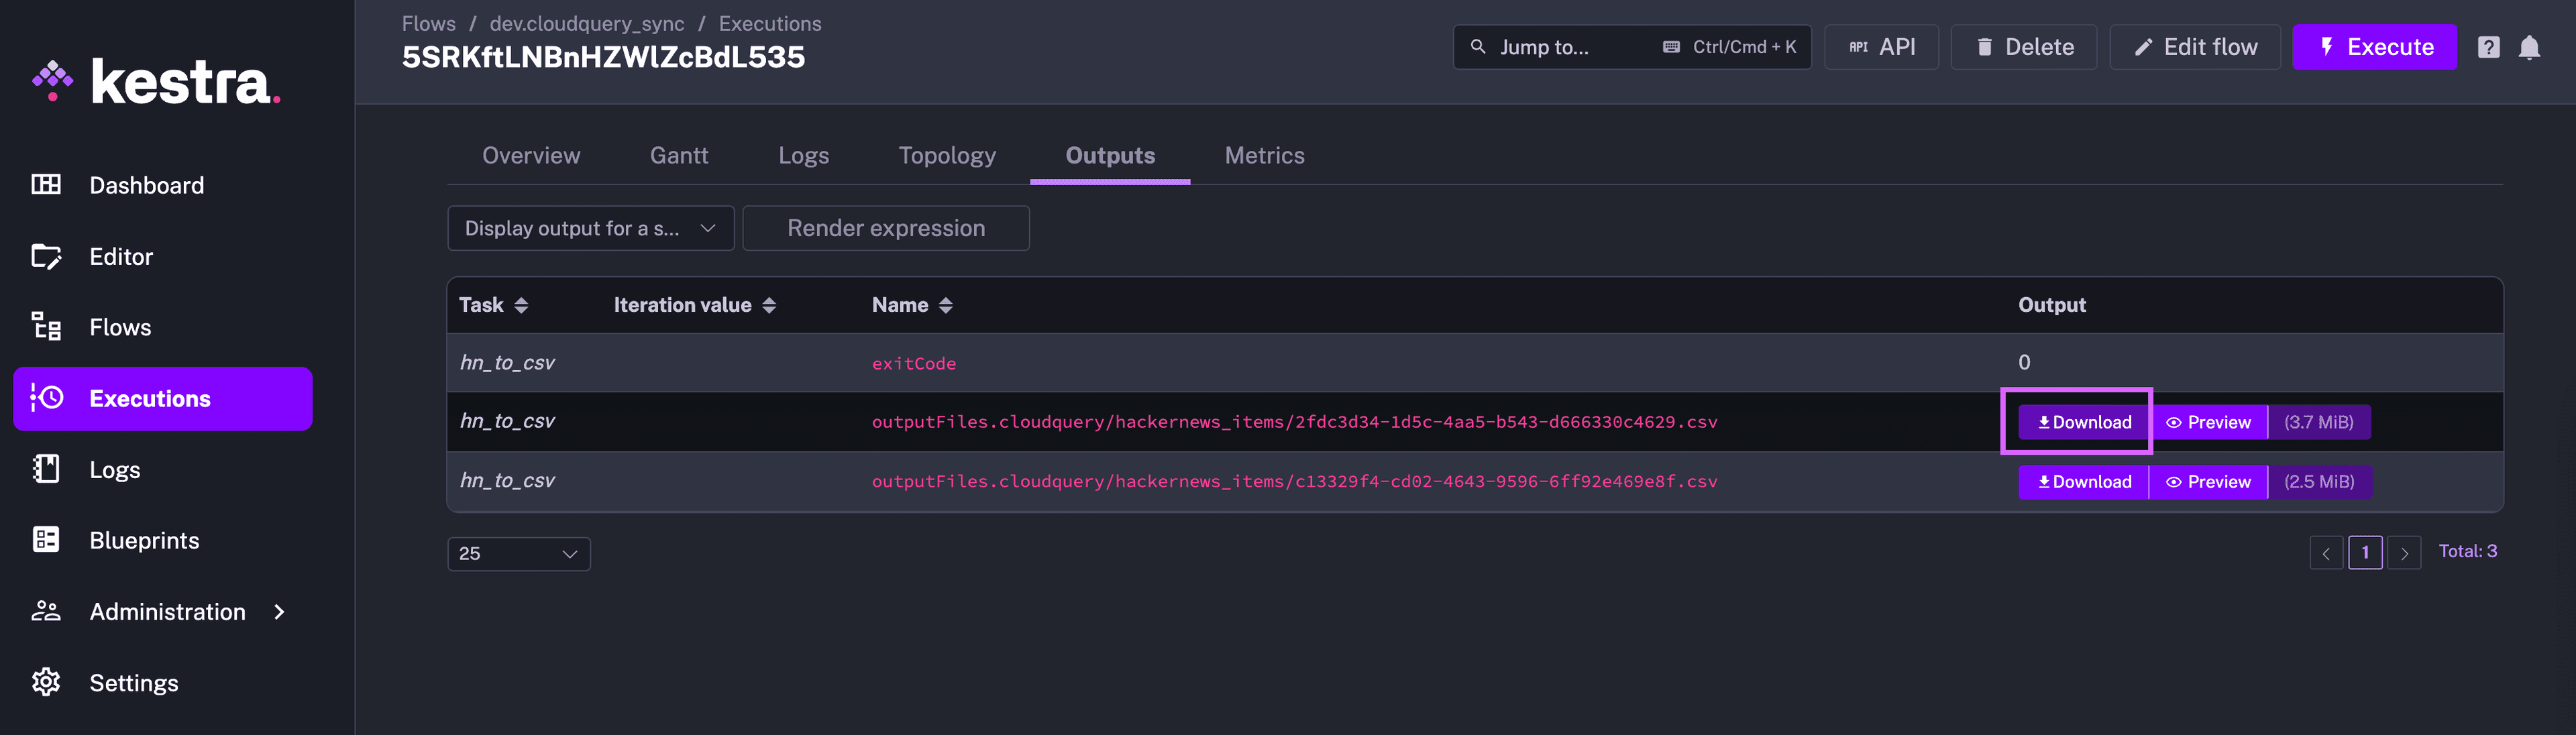
Step 3: Run the flow
To manually start a Kestra flow, click on the Execute button in the top right corner. Then, confirm by clicking on Execute.
You should now see the sync running in the Executions tab. You can navigate to the Logs tab to check the logs and validate everything runs as expected. Also, you can download the extracted CSV files from the Outputs tab:
Step 4: Schedule the flow
To run the flow periodically, we can add a trigger to run it on a schedule. Back in the Flow editor, add the following section:
triggers:
  - id: schedule
    type: io.kestra.core.models.triggers.types.Schedule
    cron: "0 9 * * *" # every day at 9am
    timezone: US/Eastern
This cron expression will run the flow every day at 09:00. You can use crontab.guru to generate cron expressions and replace the one in the example above. Kestra also supports these special values for cron:
@yearly
@annually
@monthly
@weekly
@daily
@midnight
@hourly
With this in place, remember to click Save again. Your CloudQuery sync will now run on a regular schedule.
Next steps
Caching
To speed up your syncs and save bandwidth, you can cache the downloaded plugins locally. Kestra does not provide cache for container-based tasks, but you can use a shared volume to cache the plugins.
To do this, you need to configure Kestra to enable volume mounts first.
Then configure your CloudQuery task to use the shared volume:
- id: run_sync
  type: io.kestra.plugin.cloudquery.CloudQueryCLI
  env:
    CLOUDQUERY_API_KEY: "{{ secret('CLOUDQUERY_API_KEY') }}"
  # Mount the shared volume to the CloudQuery container
  docker:
    image: ghcr.io/cloudquery/cloudquery:latest
    volumes:
      - "/tmp/cq:/app/.cq"
  commands:
  # Use the shared volume for downloading plugins
    - cloudquery sync config.yml --log-console --log-level=debug  --cq-dir=/app/.cq
Note: The shared volume is mounted to the /tmp/cq directory in the example above on the host machine. You can adjust the path to your needs.
Production deployment
This tutorial was just a quick introduction to help you get started with a CloudQuery deployment on Kestra. You can now create additional Kestra tasks to perform transformations, send notifications and more. For more information, check out the CloudQuery docs and the Kestra docs.
To productionize your Kestra deployment, you will likely need to deploy it to a cloud environment, such as Kubernetes. For more information, see the Kestra Deployment with Kubernetes guide and if you have any questions, you can reach the Kestra team via Community Slack.