Orchestrating CloudQuery Syncs with Apache Airflow and Kubernetes
Apache Airflow is a popular open source workflow management tool. It can be used to schedule CloudQuery syncs, optionally retry them and send notifications when syncs fail. In this guide, we will show you how to get started with Airflow and CloudQuery. We will use the KubernetesOperator, which allows us to run tasks in Kubernetes pods.
Prerequisites
Generating a CloudQuery API key
Downloading integrations requires users to be authenticated, normally this means running cloudquery login but that is not doable in an Apache Airflow environment. The recommended way to handle this is to use an API key. More information on generating an API Key can be found here.
Apache Airflow Installation
This guide assumes that you have a working Airflow installation and an available Kubernetes cluster, and experience with operating both of these. If you don’t, you should consider some simpler orchestration options to get started, such as GitHub Actions, Kestra, or even a simple cron-based deployment.
If you decide to proceed with Airflow, you can install it locally on Kubernetes using Minikube and the Airflow Helm chart.
You will need to have the ability to set up DAGs. When deployed to Kubernetes, this is done with Persistent Volumes and Persistent Volume Claims. For example, to map a local directory at /data/airflow/dags (inside the Minikube container, if not running on bare metal), you can use the following configs and commands to create the Persistent Volume and Persistent Volume Claim:
apiVersion: v1
kind: PersistentVolume
metadata:
  name: task-pv-volume
  labels:
    type: local
spec:
  storageClassName: manual
  capacity:
    storage: 1Gi
  accessModes:
    - ReadOnlyMany
    - ReadWriteMany
  hostPath:
    path: "/data/airflow/dags"
kubectl apply --namespace airflow -f pv-volume.yamlapiVersion: v1
kind: PersistentVolumeClaim
metadata:
name: task-pv-claim
spec:
storageClassName: manual
accessModes:
- ReadOnlyMany
resources:
requests:
storage: 100Mikubectl apply --namespace airflow -f pv-claim.yamlFinally, install the Airflow Helm chart with the persistent volume claim enabled:
helm upgrade --install airflow apache-airflow/airflow --namespace airflow --create-namespace --set dags.persistence.enabled=true \
  --set dags.persistence.existingClaim=task-pv-claim \
  --set dags.gitSync.enabled=false
You will then need to expose the Airflow web server to access the Airflow UI at http://localhost:8080:
kubectl port-forward svc/airflow-webserver 8080:8080 --namespace airflowSetting up the KubernetesOperator
The following Python code creates a DAG that runs a CloudQuery sync every day. It uses the KubernetesOperator to run the sync in a Kubernetes pod.
from datetime import datetime, timedelta

from airflow import DAG
from airflow.operators.python_operator import PythonOperator
from airflow.providers.cncf.kubernetes.operators.kubernetes_pod import KubernetesPodOperator
from kubernetes.client import models as k8s

# Change these to match your requirements. Change start_date to today's date, but keep it static
default_args = {
    'owner': '', # TODO: Set to your name
    'depends_on_past': False,
    'start_date': datetime(2023, 4, 26), # TODO: Change to today's date
    'retries': 0,
}

with DAG(
    'cloudquery_sync',
    default_args=default_args,
    schedule_interval=timedelta(days=1),
) as dag:
    cloudquery_operator = KubernetesPodOperator(
        task_id='cloudquery_sync',
        name='cloudquery-sync',
        namespace='airflow',
        image='ghcr.io/cloudquery/cloudquery:latest',
        cmds=['/app/cloudquery', 'sync', '/mnt/config.yaml', '--log-console', '--log-level', 'info'],
        # We're passing the CloudQuery API key as an environment variable for brevity, but it's better to use a k8s secret
        # See https://airflow.apache.org/docs/apache-airflow-providers-cncf-kubernetes/stable/operators.html
        env_vars={
            "CLOUDQUERY_API_KEY": "<value-of-cloudquery-api-token-ideally-not-hardcoded>",
        },
        arguments=[],
        volume_mounts=[
        k8s.V1VolumeMount(
            name="cloudquery-config", mount_path="/mnt/config.yaml", sub_path="config.yaml", read_only=True
        )
        ],
        volumes=[
          k8s.V1Volume(
            name="cloudquery-config",
            config_map=k8s.V1ConfigMapVolumeSource(
                name="cloudquery-config",
                items=[k8s.V1KeyToPath(key="config.yaml", path="config.yaml")]
            )
        )],
        get_logs=True,
    )
This relies on a ConfigMap for the CloudQuery config. To create this, first create a file called config.yaml with the contents of your CloudQuery config file. Here we will use an example config file that syncs the aws_ec2_instance table from the aws integration to a Postgres database, but refer to our Quickstart guide and the specific documentation for each integration to see how to configure it for the data you wish to sync.
kind: source
spec:
  # Source spec section
  name: aws
  path: cloudquery/aws
  version: "v32.44.0"
  tables: ["aws_s3_buckets"]
  destinations: ["postgresql"]
  spec:
    # AWS-specific configuration goes here
---
kind: destination
spec:
  name: "postgresql"
  path: "cloudquery/postgresql"
  version: "v8.12.1"
  write_mode: "overwrite-delete-stale"
  spec:
    ## integration-specific configuration for PostgreSQL.
    ## See all available options here: https://github.com/cloudquery/cloudquery/tree/main/plugins/destination/postgresql#postgresql-spec
    ## Required. Connection string to your PostgreSQL instance
    ## In production it is highly recommended to use environment variable expansion
    ## connection_string: ${PG_CONNECTION_STRING}
    connection_string: "postgresql://postgres:pass@localhost:5432/postgres?sslmode=disable"
Now, create the ConfigMap:
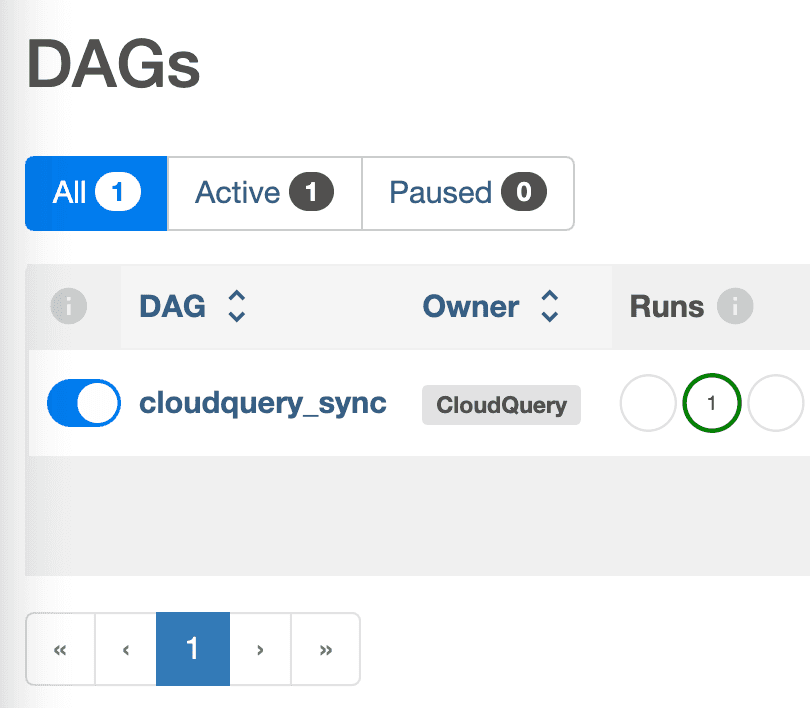
kubectl create configmap cloudquery-config --from-file=config.yaml --namespace airflowIf everything is working, you should now be able to go to the Airflow UI and see the DAG. You can trigger it manually to test it out.
Next steps
We covered the basics of how to use the KubernetesOperator to run CloudQuery syncs using Airflow. This is a complex terrain and we haven’t covered all the possible options here, so please refer to the Airflow documentation for more information. For using environment variables and secrets, see the documentation on the KubernetesPodOperator. The friendly CloudQuery Community is also always happy to help!